
Are you ready to launch? Learn how to help your brand stand out.
.png?width=350&name=Black%20Moon%20Blog%20Banner%20(59).png)
Before you can make the most out of YouLi, configure your account to connect your payment gateway, branding, profile and most importantly, your TEAM.
NOTE: To access your Account click on your name (Avatar) in the top right of the screen then click "Account" from the drop-down.
Step 1: Update Your Profile
- Your BRAND LOGO should be either your company logo or an on-brand picture of you (by default it's an image of a beach, just click on it to update). Please note that this is visible to your clients & team!
- Your NAME and EMAIL are already populated
- You can update your profile to include your:
- Contact Number (don’t forget your country code!)
- Time Zone (used to display dates to you across YouLi)
- Social Media Links - Your email and phone number will be shown on all trip pages where you are listed as TRIP PAGE CONTACT. More information about contacts here.
NOTE: If you are the Trip Owner or Main Contact, this is the contact info that will be used to send automated reminders and confirmations.
- Don’t forget to hit 'SAVE!'
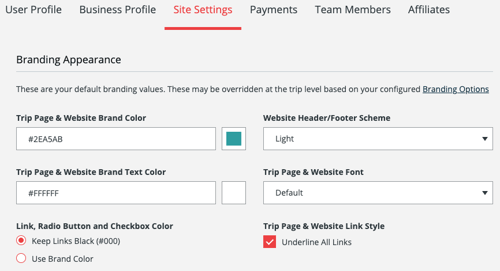
Step 2: Branding (White-Label Settings)
- Update your TEAM ALIAS - This defaults to your name, but you should change it to match your brand
IMPORTANT: This is used to create all trip page links that will be shared with your clients, so be sure to set this BEFORE sending your trip page links with your soon-to-be travelers (if you set it AFTER sharing, those links will be broken).
- Enter your Google Analytics Tracking ID
- Be sure to do this before you launch your trips so you can measure the effectiveness of your marketing efforts! - 'BUSINESS NAME' will show in the header in the contact tab of all your trip pages
- Upload a logo to be displayed in the header of your YouLi PRO+ Website (formerly Plug N Play Website) if applicable and all your TRIP PAGES
- Select brand colors via the color picker or better yet, get it from your website styles by utilizing HEX codes (and get the specific color you're looking for!)
- Under 'LOGO WEBSITE LINK', include a link back to your website, if you have one OR link to your YouLi Pro Website (formerly Plug N Play website) if you don't!
OPTIONAL: Set up your YouLi PRO+ website (formerly Plug N Play website).
If you are currently under a free account, you will need to upgrade.
Then continue on in the "YouLi Trip Pages & PRO+ Website" section (under Site Settings) to provide: a short blurb about your business, About Us, Terms & Conditions, and your Privacy Policy. All of these sections will show on your website, in addition to any of your Public & Listed Trips.
Step 3. Connect your payment gateway
- You are able to collect payments a number of ways. In the PAYMENTS tab, you can set up a Stripe account, or alternatively, you can contact support to use a Square account.
IMPORTANT: Only the Team Admin or the Team Owner can set the payment gateway for all trips.
- For your convenience, you can set defaults for your Bank Transfer method details for those Travelers that want to pay via bank transfer.
- This saves you from entering each time on a new TRIP, but you can always adjust on individual Trips, if needed
- Your bank details (to allow pay by bank transfer) are only visible to Registered Travelers
Step 4: Add Team Members or Update Your Team

NOTE: You will see how many Team Members you have available to you, next to the "Add Team Member" button. The number of users available depends on the YouLi plan you have so be sure to check the plans available to you by clicking "Upgrade" in YouLi.
Need more help?
Schedule a 1:1 Onboarding Call with one of the YouLi experts, and enjoy personalized support attuned to your business needs.